U4S1L10——Player Input
U4S1L10——Player Input
本章代码关键字
1 | PlayerInput //玩家输入类,是InputSystem提供的专门用于接受玩家输入来处理自定义逻辑的组件 |
PlayerInput
PlayerInput 是 InputSystem 提供的专门用于接受玩家输入来处理自定义逻辑的组件
主要工作原理:
- 制作和编辑配置输入文件(Input Actions文件)
- 通过
PlayerInput关联配置文件,它会自动解析该配置文件 - 关联对应的响应函数,处理对应逻辑
好处: 不需要自己进行相关输入的逻辑书写,通过配置文件即可配置想要监听的对应行为,让我们专注于输入事件触发后的逻辑处理
换句话说,PlayerInput 让我们不再需要去通过配置文件来手动生成 C# 脚本然后实例化,而是直接通过 PlayerInput 关联一个输入配置文件,然后直接书写监听逻辑即可
添加 PlayerInput 组件
选择任意对象(一般为一个玩家对象),为其添加 PlayerInput 组件
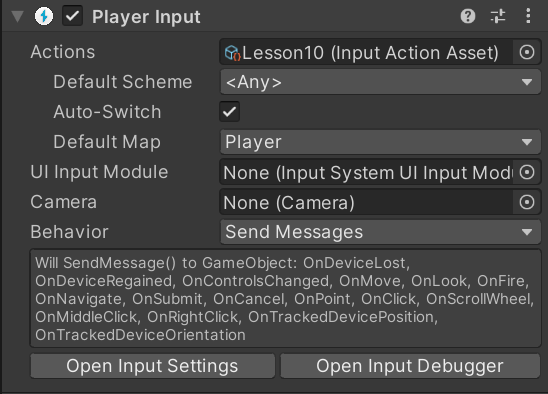
PlayerInput参数相关

-
Actions:行为,需要关联一个输入配置文件,如果没有关联可以直接创建
一套输入动作和玩家相关联,帮助我们监听一些按键的输入
- Default Control Scheme:默认启用哪一个控制方案
- Auto-Switch:自动切换设备(Control Scheme)
- Default Actions Map:默认启用哪一个行为映射方案
-
UI Input Module:UI输入模块
当你使用新输入系统Input System时,UGUI的 Event System 上的 Standalone Input Module 会提示切换为 Input System UI Input Module,切换后,就可以将该UI输入模块关联到这里
-
Camera:关联摄像机,当分屏设置时才需修改此选项,可用于PlayerInputManager的分屏
-
Behavior:如何通知游戏对象上执行对应逻辑
具体内容看这里 ——> 行为执行模式
- SendMessage:将逻辑脚本挂载在和
PlayerInput同一对象上
会通过SendMessage通知执行对应函数 - BroadcastMessage:将逻辑脚本挂载在其自身或子对象上
会通过BroadcastMessage通知执行对应函数 - Invoke UnityEvent Actions:
通过拖拽脚本关联函数指明想要执行的函数逻辑 - Invoke CSharp Events:通过C#事件监听处理对应逻辑
通过获取PlayerInput进行事件监听
- SendMessage:将逻辑脚本挂载在和
-
Open Input Settings:打开Input System的设置
-
Open Input Debugger:打开Input Debug调试
行为执行模式
这里的行为执行模式是 PlayerInput 中参数 Behaviour 中的各个模式,它们决定了 PlayerInput 如何通知游戏对象上执行对应逻辑
-
Send Messages

选择该选项后,会出现下方的英文,
大致意思是,PlayerInput 将会通过SendMessage() 来调用自己依附的游戏对象上的脚本上的与输入对应的监听函数,
每种输入行为(配置文件的InputAction)会调用名字为On+该输入行为名的函数在自定义脚本中,申明名为 “
On+行为名” 的函数,该函数没有参数 或者 参数类型为InputValue
将该自定义脚本挂载到PlayerInput依附的对象上,当触发对应输入时会自动调用函数并且还有默认的3个和设备相关的函数可以调用:
- 设备注册(当控制器从设备丢失中恢复并再次运行时会触发):
OnDeviceRegained(PlayerInput input) - 设备丢失(玩家失去了分配给它的设备之一时触发,例如,当无线设备耗尽电池时):
OnDeviceLost(PlayerInput input) - 控制器切换(切换时触发):
OnControlsChanged(PlayerInput input)
例如:
1
2
3
4
5
6
7
8
9
10
11
12
13
14
15
16
17
18
19
20
21
22
23
24
25
26
27
28
29
30
31//注意!这种函数只会在值改变时进入函数
//也就是说,需要持续获取值的函数,应当将输入的值存储下来
public void OnMove(InputValue value)
{
print("Move");
}
public void OnLook(InputValue value)
{
print("Look");
}
public void OnFire(InputValue value)
{
print("Fire");
}
//设备相关函数
public void OnDeviceLost(PlayerInput input)
{
print("设备丢失");
}
public void OnDeviceRegained(PlayerInput input)
{
print("设备注册");
}
public void OnControlsChanged(PlayerInput input)
{
print("控制器切换");
}
- 设备注册(当控制器从设备丢失中恢复并再次运行时会触发):
-
Broadcast Messages

选择该选项后,会出现下方的英文,
大致意思是,PlayerInput 将会通过BroadcastMessage() 来调用自己依附的游戏对象上的脚本上的与输入对应的监听函数,
每种输入行为(配置文件的InputAction)会调用名字为On+该输入行为名的函数该模式基本和SendMessage规则一致,唯一的区别是,自定义脚本不仅可以挂载在PlayerInput依附的对象上,还可以挂载在其子对象下
例如:
1
2
3
4
5
6
7
8
9
10
11
12
13
14
15
16
17
18
19
20
21
22
23
24
25
26
27
28
29
30
31
//注意!这种函数只会在值改变时进入函数
//也就是说,需要持续获取值的函数,应当将输入的值存储下来
public void OnMove(InputValue value)
{
print("Move");
}
public void OnLook(InputValue value)
{
print("Look");
}
public void OnFire(InputValue value)
{
print("Fire");
}
//设备相关函数
public void OnDeviceLost(PlayerInput input)
{
print("设备丢失");
}
public void OnDeviceRegained(PlayerInput input)
{
print("设备注册");
}
public void OnControlsChanged(PlayerInput input)
{
print("控制器切换");
}

-
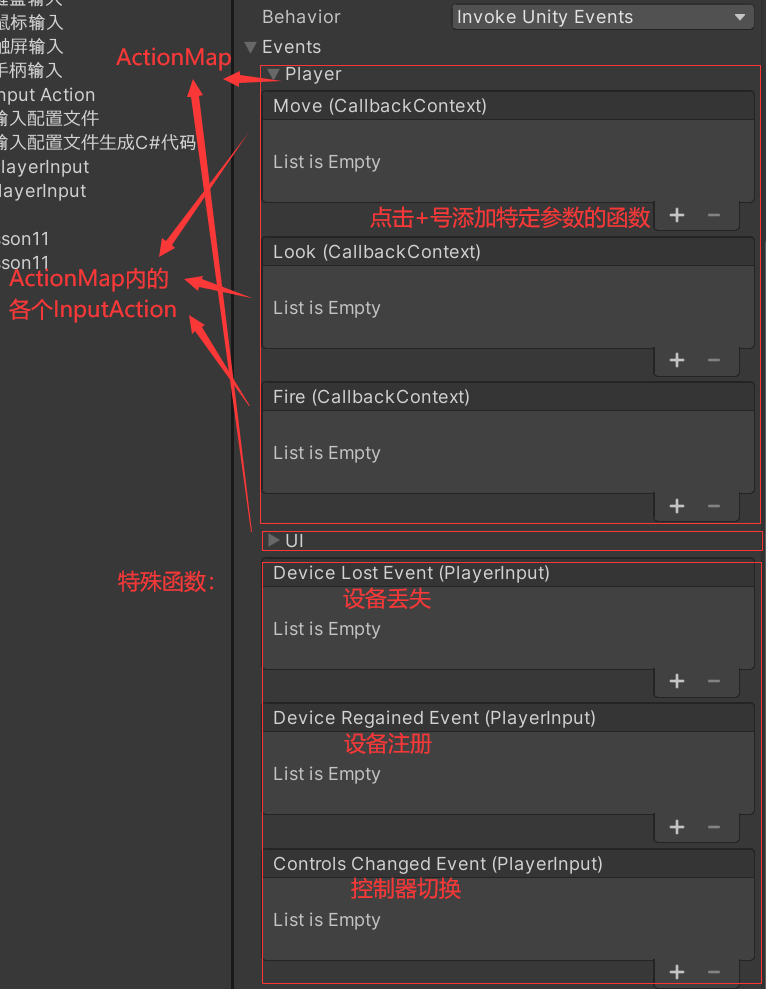
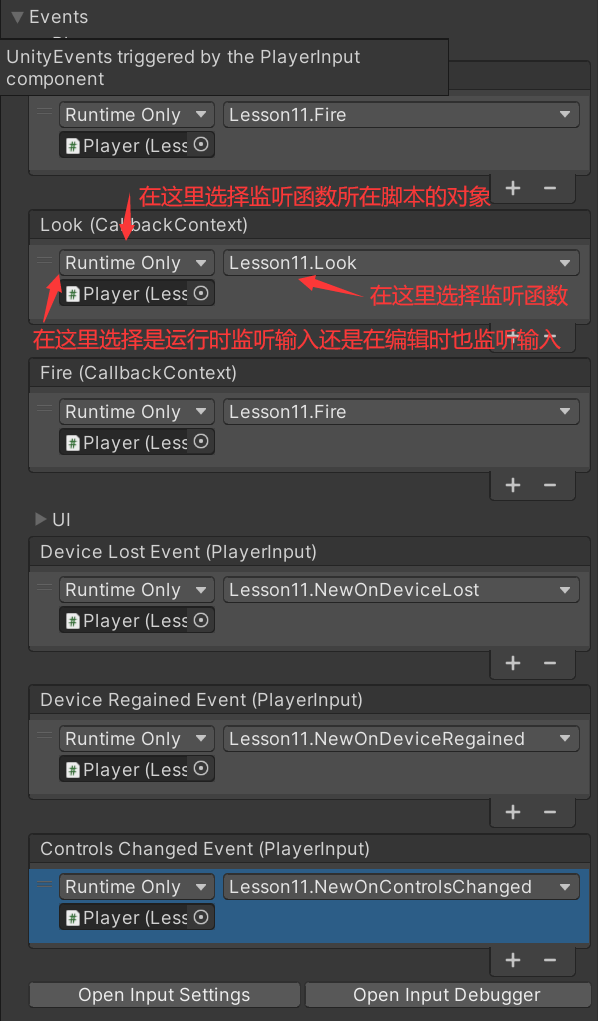
Invoke UnityEvent Actions

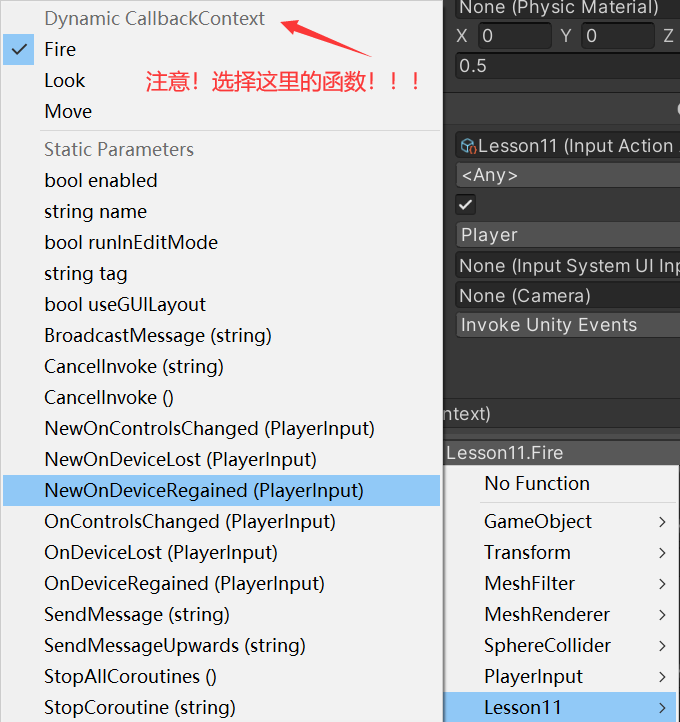
该模式可以让我们在Inspector窗口上通过拖拽的形式关联响应函数
注意:响应函数的参数类型 需要改为InputAction.CallbackContext
哪怕要监听输入的方法不在
PlayerInput依附的对象上,该模式也可以监听该PlayerInput的输入1
2
3
4
5
6
7
8
9
10
11
12
13
14
15
16
17
18
19
20
21
22
23
24
25
26
27
28
29
30//函数名可以随意,且脚本也可以不在PlayerInput依附的对象上
public void Fire(InputAction.CallbackContext context)
{
print("开火");
}
public void Move(InputAction.CallbackContext context)
{
print("移动");
}
public void Look(InputAction.CallbackContext context)
{
print("看向");
}
public void NewOnDeviceLost(PlayerInput input)
{
print("设备丢失");
}
public void NewOnDeviceRegained(PlayerInput input)
{
print("设备注册");
}
public void NewOnControlsChanged(PlayerInput input)
{
print("控制器切换");
}

-
Invoke CSharp Events
-
获取
PlayerInput组件1
2
3
4
5void Start()
{
PlayerInput input = GetComponent<PlayerInput>();
} -
获取对应事件进行委托函数添加
1
2
3
4
5
6
7
8
9
10
11
12
13
14
15
16
17
18
19
20
21
22
23
24
25
26
27
28
29
30
31
32
33
34
35
36
37
38
39
40
41
42
43
44
45
46void Start()
{
PlayerInput input = GetComponent<PlayerInput>();
//特殊函数
input.onDeviceLost += OnDeviceLost; //设备丢失委托
input.onDeviceRegained += OnDeviceRegained; //设备注册委托
input.onControlsChanged += OnControlsChanged; //控制器切换委托
//当监听到任何一种输入时
input.onActionTriggered += OnActionTrigger;
}
private void OnActionTrigger(InputAction.CallbackContext context)
{
print(context.action.name); //触发的输入行为的名字
print(context.control.name); //触发的输入的设备的名字
//我们可以通过switch来区分不同的输入行为名字来执行对应的逻辑
switch (context.action.name)
{
case "Fire":
print("开火");
break;
case "Look":
print("看向");
print(context.ReadValue<Vector2>());
break;
case "Move":
print("移动");
print(context.ReadValue<Vector2>());
break;
}
}
public void OnDeviceLost(PlayerInput input)
{
print("设备丢失");
}
public void OnDeviceRegained(PlayerInput input)
{
print("设备注册");
}
public void OnControlsChanged(PlayerInput input)
{
print("控制器切换");
} -
当触发输入时会自动触发事件调用对应函数
-
监听函数关键参数 InputValue 和 InputAction.CallbackContext
行为执行模式里,前两种模式监听函数需要的参数是 InputValue,
后两种模式监听函数需要的参数是InputAction.CallbackContext
其中 InputAction.CallbackContext 相关内容已经在之前的笔记里详细记录,这里不再阐述
InputValue
-
是否按下
1
2
3
4
5
6
7
8public void OnFire(InputValue value)
{
print("Fire");
if (value.isPressed)
{
print("按下");
}
} -
得到具体返回值
泛型内填入的类型参数 取决于 输入返回值的类型
1
2
3
4
5
6
7
8
9
10
11public void OnMove(InputValue value)
{
print("Move");
print(value.Get<Vector2>());
}
public void OnLook(InputValue value)
{
print("Look");
print(value.Get<Vector2>());
}
PlayerInput代码参数相关
-
当前激活的输入映射集
映射集内部包含大量的输入行为对象即
InputAction 对象,我们可以通过索引器输入名字来获取指定的InputAction对象,进而获取到其输入值
我们可以用于在Update里每帧获取到输入值1
2
3
4
5
6void Start()
{
PlayerInput input = GetComponent<PlayerInput>();
InputActionMap map = input.currentActionMap;
print(map["Move"].ReadValue<Vector2>());
} -
激活PlayerInput对象的输入
1
2
3
4
5
void Start()
{
PlayerInput input = GetComponent<PlayerInput>();
input.ActivateInput();
} -
失活PlayerInput对象的输入
1
2
3
4
5
void Start()
{
PlayerInput input = GetComponent<PlayerInput>();
input.DeactivateInput();
}
