UEDL7——Inspector窗口拓展

本章代码关键字

1
2
3
4
5
6
7
8
9
10
11
12
13
14
15
16
17
[CustomEditor()]                                    //如要让类为另外一个类拓展在Inspector窗口的显示,需要添加该特性
Editor //编辑器类,如要让类为另外一个类拓展在Inspector窗口的显示,需要继承它
SerializedProperty //代表被拓展的脚本对象中的属性,我们可以通过它来修改被拓展的脚本对象中的属性
SerializedObject //代表被拓展的脚本对象,可获取被拓展的脚本对象中的属性,修改其在Inspector窗口的显示内容
editor.serializedObject //该类拓展显示的脚本对象,通过它获取属性,或者更新显示Inspector窗口的逻辑
editor.serializedObject.FindProperty() //将SerializedProperty变量与脚本对象的属性关联起来
OnInspectorGUI() //绘制Inspector窗口上控件的生命周期函数,在这里重写各个控件的绘制逻辑
editor.serializedObject.Update() //更新序列化对象的表示形式,绘制各个控件的逻辑在该方法下面写
editor.serializedObject.ApplyModifiedProperties() //应用属性显示的修改,与上一个语句一起,将绘制各个控件的逻辑包裹起来
serializedProperty.floatValue //被拓展的脚本对象中的float属性的值,可以通过它来修改
editor.target //获取脚本依附的对象(被拓展显示内容的脚本对象,而不是依附的GameObject)
EditorGUILayout.PropertyField() //按照属性类型自己去处理控件绘制的逻辑,其实就是默认的属性控件绘制方法
serializedProperty.arraySize //获取序列化属性对应的数组或者列表的真实元素数量
serializedProperty.InsertArrayElementAtIndex() //为序列化属性对应的数组或者列表在某个索引处插入元素
serializedProperty.DeleteArrayElementAtIndex() //为序列化属性对应的数组或者列表删除某个索引处元素
serializedProperty.GetArrayElementAtIndex() //通过序列化属性,来获取其对应的数组或者列表中的某个元素的序列化属性
ISerializationCallbackReceiver

Inspector窗口自定义显示

我们可以完全自定义某一个脚本在Inspector窗口的相关显示

我们为继承Editor​的脚本,添加[CustomEditor(typeof(想要自定义Inspector窗口的脚本))]​特性
在该脚本中按照一定的规则进行编写,便可为Inspector窗口中的某个脚本自定义窗口布局

[CustomEditor()]​特性还可用于拓展Scene窗口的显示,具体可看:Handles​

SerializedObject和SerializedProperty的作用

SerializedObject​ 和 SerializedProperty​ 主要用于在 Unity 编辑器中操作和修改序列化对象的属性。
它们通常在自定义编辑器中使用,以创建更灵活、可定制的属性面板

我们只需要记住简单的规则:

  • SerializedObject​ 代表被拓展的脚本对象,我们可以从该属性获取被拓展的脚本对象中的属性,或者修改其在Inspector窗口的显示内容
  • SerializedProperty​ 代表被拓展的脚本对象中的属性(成员变量),我们可以通过SerializedProperty​来修改被拓展的脚本对象中的属性,
    也需要通过这个序列化属性,来自定义被拓展的脚本对象的属性在Inspector窗口上的显示

关于它们的详细内容:

自定义脚本在Inspector窗口中显示的内容

关键步骤:

  1. 单独为某一个脚本实现一个自定义脚本,并且脚本需要继承 Editor
    一般该脚本命名为 自定义脚本名 + Editor

    假设我们要对下面这个脚本进行Inspector窗口的拓展:

    1
    2
    3
    4
    5
    6
    7
    8
    using UnityEngine;

    public class Lesson22 : MonoBehaviour
    {
    public int atk; //攻击力
    public float def; //防御力
    public GameObject obj; //敌对目标对象依附的GameObject
    }
  2. 在该脚本前加上特性

    • 命名空间:UnityEditor
    • 特性名:[CustomEditor(想要自定义脚本类名的Type)]

    因此,声明一个这样的类,继承Editor​并加上特性[CustomEditor()]

    1
    2
    3
    4
    using UnityEditor;

    [CustomEditor(typeof(Lesson22))]
    public class Lesson22Editor : Editor { }
  3. 声明对应SerializedProperty​序列化属性 对象,主要通过它和自定义脚本中的成员进行关联

    可以利用继承Editor​后的父类成员serializedObject​中的FindProperty("成员变量名")​方法关联对应成员;
    比如:SerializedProperty mySerializedProperty;
    mySerializedProperty = serializedObject.FindProperty("自定义脚本中的成员名");​,一般在OnEnable​函数中初始化

    因此,对于Lesson22​这个脚本的成员关联写法如下:

    1
    2
    3
    4
    5
    6
    7
    8
    9
    10
    11
    12
    13
    14
    15
    16
    using UnityEditor;

    [CustomEditor(typeof(Lesson22))]
    public class Lesson22Editor : Editor
    {
    private SerializedProperty atk;
    private SerializedProperty def;
    private SerializedProperty obj;

    private void OnEnable()
    {
    atk = serializedObject.FindProperty("atk");
    def = serializedObject.FindProperty("def");
    obj = serializedObject.FindProperty("obj");
    }
    }
  4. 重写OnInspectorGUI()​函数,该函数控制了Inspector窗口中显示的内容
    只需要在其中重写绘制逻辑,便可以自定义窗口,重写的逻辑和编写编辑器窗口逻辑很相似

    注意:重写的绘制各个控件的逻辑需要包裹在下面两句代码之间
    更新序列化对象的表示形式 serializedObject.Update();​,在调用该方法后就要编写自定义的Inspector窗口上显示的逻辑
    应用属性修改 serializedObject.ApplyModifiedProperties();​,执行了自定义的Inspector窗口上显示的逻辑后,最后就要执行该方法

    例如我们要使用各种EditorGUI​的控件去控制脚本的属性:

    1
    2
    3
    4
    5
    6
    7
    8
    9
    10
    11
    12
    13
    14
    15
    16
    17
    18
    19
    20
    21
    22
    23
    24
    25
    26
    27
    28
    29
    30
    31
    32
    33
    34
    35
    36
    using UnityEditor;
    using UnityEngine;

    [CustomEditor(typeof(Lesson22))]
    public class Lesson22Editor : Editor
    {
    private SerializedProperty atk;
    private SerializedProperty def;
    private SerializedProperty obj;

    private bool foldOut;

    private void OnEnable()
    {
    atk = serializedObject.FindProperty("atk");
    def = serializedObject.FindProperty("def");
    obj = serializedObject.FindProperty("obj");
    }

    public override void OnInspectorGUI()
    {
    //base.OnInspectorGUI(); //这是原本的绘制脚本在Inspector窗口内的方法
    serializedObject.Update();
    //在这里写自定义Inspector窗口的内容
    foldOut = EditorGUILayout.BeginFoldoutHeaderGroup(foldOut, "基础属性");
    if (foldOut)
    {
    GUILayout.Button("测试自定义Inspector窗口");
    EditorGUILayout.IntSlider(atk, 0, 100, "攻击力");
    def.floatValue = EditorGUILayout.FloatField("防御力", def.floatValue);
    EditorGUILayout.ObjectField(obj, new GUIContent("敌对对象"));
    }
    EditorGUILayout.EndFoldoutHeaderGroup();
    serializedObject.ApplyModifiedProperties();
    }
    }

显示效果:

image

获取脚本依附的对象(被拓展显示内容的脚本对象)

注意:此处的target​成员得到的并不是依附的GameObject​对象,而是被拓展显示的组件对象
这里的target​其实是依附在GameObject​上的组件对象

1
2
3
4
5
6
7
8
9
10
11
12
13
14
15
16
17
18
19
20
21
22
23
24
25
26
27
28
29
30
public class Lesson22Editor : Editor
{
private SerializedProperty atk;
private SerializedProperty def;
private SerializedProperty obj;

private bool foldOut;

private void OnEnable()
{
atk = serializedObject.FindProperty("atk");
def = serializedObject.FindProperty("def");
obj = serializedObject.FindProperty("obj");
}

public override void OnInspectorGUI()
{
serializedObject.Update();
//在这里写自定义Inspector窗口的内容
foldOut = EditorGUILayout.BeginFoldoutHeaderGroup(foldOut, "基础属性");
if (foldOut)
{
if (GUILayout.Button("测试自定义Inspector窗口"))
{
Debug.Log(target.name);
}
}
serializedObject.ApplyModifiedProperties();
}
}

按下"测试自定义Inspector窗口"​按钮后,输出的内容:

image

数组和List属性的显示方式

如果想要自定义数组和List属性在Inspector窗口上的显示,就需要在获取到自定义数组和List属性的同时,
获取其中所有的元素的序列化属性,这样,我们才可以自定义数组或者列表属性中的各个元素的显示
同时,我们可能还需要根据用户在Inspector窗口上的输入,动态的调整数组和List属性的元素数量

数组、List属性在Inspector窗口显示的基础方式

主要知识点:EditorGUILayout.PropertyField(SerializedProperty对象, 标题);​,该API会按照属性类型自己去处理控件绘制的逻辑,

  • 参数一:要显示的SerializedProperty​对象
  • 参数二:GUIContent​标题

对于如何绘制自定义属性 ——> 自定义类属性在Inspector窗口显示的基础方式

假设我们要在Inspector窗口上显示如下的属性:

1
2
3
4
5
6
7
public class Lesson22 : MonoBehaviour
{
public string[] strs;
public int[] ints;
public GameObject[] gameObjects;
public List<GameObject> listObjs;
}

我们就需要在对应的显示拓展类里这样写:

1
2
3
4
5
6
7
8
9
10
11
12
13
14
15
16
17
18
19
20
21
22
23
24
25
26
27
28
29
30
using UnityEditor;
using UnityEngine;

[CustomEditor(typeof(Lesson22))]
public class Lesson22Editor : Editor
{
private SerializedProperty strs;
private SerializedProperty ints;
private SerializedProperty gameObjects;

private SerializedProperty listObjs;

private void OnEnable()
{
strs = serializedObject.FindProperty("strs");
ints = serializedObject.FindProperty("ints");
gameObjects = serializedObject.FindProperty("gameObjects");
listObjs = serializedObject.FindProperty("listObjs");
}

public override void OnInspectorGUI()
{
serializedObject.Update();
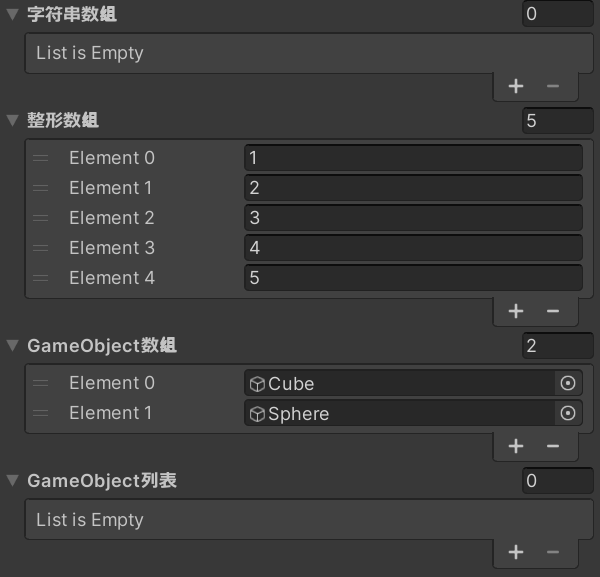
EditorGUILayout.PropertyField(strs, new GUIContent("字符串数组"));
EditorGUILayout.PropertyField(ints, new GUIContent("整形数组"));
EditorGUILayout.PropertyField(gameObjects, new GUIContent("GameObject数组"));
EditorGUILayout.PropertyField(listObjs, new GUIContent("GameObject列表"));
serializedObject.ApplyModifiedProperties();
}
}

显示效果如下:

image

数组、List属性在Inspector窗口显示的自定义方式

如果我们不想要Unity默认的绘制方式去显示数组、List​ 相关内容,想要使用自己的逻辑绘制各个元素
我们也可以完全自定义布局方式

主要知识点:利用SerializedProperty​中数组相关的API来完成自定义

  1. arraySize​ 获取序列化属性对应的数组或List​实际容量

    在遍历各个元素时,需要通过这里获取的实际容量,判断数组或者列表是否需要扩容,或者判断缩减数组或者列表多少元素

    1
    count = listObjs.arraySize;
  2. InsertArrayElementAtIndex(索引)​ 为数组或者列表在指定索引插入默认元素(容量arraySize​会变化)

    我们通过这个方法来为序列化属性对应的数组或者列表扩充容量

    1
    2
    if (listObjs.arraySize <= i)
    listObjs.InsertArrayElementAtIndex(i);
  3. DeleteArrayElementAtIndex(索引)​ 为数组或者列表在指定索引删除元素(容量arraySize​会变化)

    我们通过这个方法来为序列化属性对应的数组或者列表缩减容量

    1
    2
    3
    4
    for (int i = listObjs.arraySize - 1; i >= count; i--)
    {
    listObjs.DeleteArrayElementAtIndex(i);
    }
  4. GetArrayElementAtIndex(索引)​ 获取数组或者列表中指定索引位置的 SerializedProperty​ 对象

    通过该方法,我们可以获取到数组或者列表内的元素,我们可以通过获取到的元素来绘制自定义控件,
    使得各个数组或者列表的各个元素在Inspector窗口上的显示可以更加的自定义化

    1
    2
    3
    4
    5
    6
    //根据容量绘制需要设置的每一个索引位置的对象
    for (int i = 0; i < count; i++)
    {
    SerializedProperty indexProperty = listObjs.GetArrayElementAtIndex(i);
    EditorGUILayout.ObjectField(indexProperty, new GUIContent($"索引{i}"));
    }

假设我们要让listObjs​在Inspector窗口上这样显示:
List容量,数组或列表内的各元素的显示使用IntField​或者objectField​控件显示
修改List容量可以修改元素控件绘制的数量

image

我们需要这样实现:

  • 要显示List容量,我们需要使用EditorGUILayout.IntField​来绘制一个输入整数控件,并配套一个count​变量
  • 每次在Inspector窗口上显示脚本内容时,都需要初始化count​变量,使用arraySize​这个数组或者列表的实际容量来赋值
    否则当我们重新显示脚本内容时,就会因为count​的值被清零,而导致实际存在的元素被隐藏,不被绘制出来
  • 当我们将List容量的数字改小时,我们需要从尾遍历List,调用DeleteArrayElementAtIndex​将那些多余的元素删除掉
    直到arraySize​的值等于List容量设置的count​值,这样就实现了修改List容量来缩减数组或者列表容量
  • 绘制List容量控件
  • 由于最开始通过serializedObject​得到的数组和list元素数量是0,因此直接根据count​变量遍历会抛出空引用错误
    因此当arraySize​的值小于count​变量值时,我们需要进行扩容,从count​开始,调用InsertArrayElementAtIndex​添加元素
    这样我们同时实现了修改List容量来扩充数组或者列表容量
  • 通过count​变量,遍历获取列表内各个元素的SerializedProperty​对象,根据这个对象来绘制控件
1
2
3
4
5
6
7
8
9
10
11
12
13
14
15
16
17
18
19
20
21
22
23
24
25
26
27
28
29
30
31
32
33
34
35
36
37
38
39
40
41
42
43
44
45
46
47
48
49
private SerializedProperty listObjs;

private int count;

private bool foldOut;

private void OnEnable()
{
//默认得到的数组和list元素为空
listObjs = serializedObject.FindProperty("listObjs");

//初始化当前容量,否则,每次显示脚本的窗口时,count都会清零,导致显示不全
count = listObjs.arraySize;
}

public override void OnInspectorGUI()
{
serializedObject.Update();
//在这里写自定义Inspector窗口的内容
foldOut = EditorGUILayout.BeginFoldoutHeaderGroup(foldOut, "基础属性");
if (foldOut)
{
//容量设置
count = EditorGUILayout.IntField("List容量", count);

//每帧绘制之前,判断是否要缩减容量,移除尾部的元素
//因此需要从尾部往前去清理,当我们将外部设置的count减少时,就需要清除多出来的内容
for (int i = listObjs.arraySize - 1; i >= count; i--)
{
listObjs.DeleteArrayElementAtIndex(i);
}

//根据容量绘制需要设置的每一个索引位置的对象
for (int i = 0; i < count; i++)
{
//因为默认得到的数组和list元素为空,直接通过索引去获取这些不存在的元素将会报错
//因此我们需要通过arraySize来判断当前索引对应的元素是否存在,
//若不存在,就插入一个默认元素来扩容
if (listObjs.arraySize <= i)
listObjs.InsertArrayElementAtIndex(i);

SerializedProperty indexProperty = listObjs.GetArrayElementAtIndex(i);
//根据获取到的数组或者列表内的元素的序列化属性,自定义其在Inspector窗口上的显示
EditorGUILayout.ObjectField(indexProperty, new GUIContent($"索引{i}"));
}
}
EditorGUILayout.EndFoldoutHeaderGroup();
serializedObject.ApplyModifiedProperties();
}

我们可以根据以上代码,修改元素控件的绘制逻辑,达到自定义数组和List显示方式的目的

自定义类属性的显示方式

这里的自定义类属性,是指的是用户自己声明的类对应的变量的显示方式
如果想要自定义类属性在Inspector窗口上的显示,就需要在获取到自定义类属性的同时,
获取该类对象所有的属性(成员变量)的序列化属性,这样,我们才可以自定义数组或者列表属性中的各个元素的显示

自定义类属性在Inspector窗口显示的基础方式

主要知识点:
EditorGUILayout.PropertyField(SerializedProperty对象, 标题);
该API会按照属性类型自己去处理控件绘制的逻辑

假设我们要在Inspector窗口上显示如下的属性:

1
2
3
4
5
6
7
8
9
10
11
[Serializable]
public class MyCustomPro
{
public int i;
public float f;
}

public class Lesson22 : MonoBehaviour
{
public MyCustomPro myCustom;
}

我们就需要在对应的显示拓展类里这样写:

1
2
3
4
5
6
7
8
9
10
11
12
13
14
15
16
17
18
19
20
using UnityEditor;
using UnityEngine;

[CustomEditor(typeof(Lesson22))]
public class Lesson22Editor : Editor
{
private SerializedProperty myCustom;

private void OnEnable()
{
myCustom = serializedObject.FindProperty("myCustom");
}

public override void OnInspectorGUI()
{
serializedObject.Update();
EditorGUILayout.PropertyField(myCustom, new GUIContent("我的自定义属性"));
serializedObject.ApplyModifiedProperties();
}
}

显示效果如下:​image

自定义类属性在Inspector窗口显示的自定义方式

如果我们不想要Unity默认的绘制方式去显示 自定义数据结构类 相关内容,想要通过自己的逻辑来绘制自定义数据结构类的显示
我们也可以完全自定义布局方式

主要知识点:

  1. SerializedProperty.FindPropertyRelative("属性")​:通过属性的序列化对象来寻找相对属性
  2. serializedObject.FindProperty("属性.子属性")​:直接获取属性的子属性

以上两个方法都可以获取某个自定义类属性的子属性的序列化对象,
只是一个需要先获取自定义类属性,另一个可以直接通过serializedObject​获取

得到自定义类属性的子属性的序列化对象后,我们就可以自己编写绘制逻辑,达到自定义显示的效果

假设我们还是要在Inspector窗口上显示如下的属性:

1
2
3
4
5
6
7
8
9
10
11
[Serializable]
public class MyCustomPro
{
public int i;
public float f;
}

public class Lesson22 : MonoBehaviour
{
public MyCustomPro myCustom;
}

我们就需要在对应的显示拓展类里这样写(两种方法都使用):

1
2
3
4
5
6
7
8
9
10
11
12
13
14
15
16
17
18
19
20
21
22
23
24
25
26
using UnityEditor;
using UnityEngine;

[CustomEditor(typeof(Lesson22))]
public class Lesson22Editor : Editor
{
private SerializedProperty myCustomI;
private SerializedProperty myCustomF;

private void OnEnable()
{
//使用两种方式获取自定义类属性的属性
myCustomI = myCustom.FindPropertyRelative("i");
myCustomF = serializedObject.FindProperty("myCustom.f");
}

public override void OnInspectorGUI()
{
serializedObject.Update();
//根据获取到的自定义类属性的属性的序列化属性,自定义其在Inspector窗口上的显示
myCustomI.intValue = EditorGUILayout.IntField("自定义属性中的I", myCustomI.intValue);
myCustomF.floatValue = EditorGUILayout.FloatField("自定义属性中的F", myCustomF.floatValue);

serializedObject.ApplyModifiedProperties();
}
}

显示效果如下:image

字典属性的显示方式

[SerializeField]​特性

让私有字段可以被序列化(能够在Unity的Inspector窗口被看到),回顾请看:[SerializeField]​

在Inspector窗口编辑字典成员

Unity默认是不支持Dictionary​在Inspector窗口被显示的,我们只有利用两个List​(或数组)成员来间接设置Dictionary

ISerializationCallbackReceiver接口

ISerializationCallbackReceiver​接口是Unity提供的用于序列化和反序列化时执行自定义逻辑的接口
实现该接口的类能够在对象被序列化到磁盘或从磁盘反序列化时执行一些额外代码

接口中包括如下函数:

  • OnBeforeSerialize()​:在对象被序列化之前调用,当Inspector窗口上显示类对象的属性时,就会每帧执行序列化操作
  • OnAfterDeserialize()​:在对象从磁盘反序列化后调用,当我们通过Inspector窗口修改类对象的属性时,就会执行反序列化操作

由于我们需要用两个List​存储Dictionary​的具体值,相当于字典中的真正内容是存储在两个List​中的,所以我们需要在

  • OnBeforeSerialize()​序列化之前:将Dictionary​里的数据存入List​中进行序列化
  • OnAfterDeserialize()​反序列化之后:将List​中反序列化出来的数据存储到Dictionary​中

假设要让被拓展Inspector显示的脚本中的字典属性与两个列表之间相互关联,就需要继承该接口并实现方法,方法内关联列表与字典

1
2
3
4
5
6
7
8
9
10
11
12
13
14
15
16
17
18
19
20
21
22
23
24
25
26
27
28
29
30
31
32
33
34
35
36
37
38
using System;
using System.Collections;
using System.Collections.Generic;
using UnityEngine;

public class Lesson22 : MonoBehaviour, ISerializationCallbackReceiver
{
public Dictionary<int, string> myDic = new Dictionary<int, string>() { { 1, "123" }, { 2, "234" } };

//这两个属性用于辅助字典在Inspector窗口上的显示
[SerializeField]private List<int> keys = new List<int>();
[SerializeField]private List<string> values = new List<string>();

public void OnBeforeSerialize()
{
//在序列化该类之前,清空两个列表,然后将字典的键和值分别存储到列表内
keys.Clear();
values.Clear();
foreach (var item in myDic)
{
keys.Add(item.Key);
values.Add(item.Value);
}
}

public void OnAfterDeserialize()
{
//在反序列化该类之后,将字典清空,将两个列表内存储的键值对存储到字典内
myDic.Clear();
for (int i = 0; i < keys.Count; i++)
{
if (!myDic.ContainsKey(keys[i]))
myDic.Add(keys[i], values[i]);
else
Debug.LogWarning("字典Dictionary容器中不允许有相同的键");
}
}
}

以上的代码就将keys​和values​这两个列表与myDic​这个字典关联起来了,具体关联的原理是:
在Inspector窗口上显示的字典相关内容,实际上读取和修改的是keys​和values​这两个列表的序列化数据,因此:

  • 当在Inspector窗口上修改keys​和values​这两个列表的数据时,或者运行Unity程序时,会触发反序列化,
    反序列化后会执行OnAfterDeserialize()​,此时就会将两个列表的反序列化出来的数据,写入到字典内
  • Inspector窗口上显示该类的对象时,会执行序列化,序列化前会执行OnBeforeSerialize()
    将字典内存储的数据写入到两个列表内,这样字典的数据就可以通过列表序列化存储起来

这样,不可序列化的字典就可以通过两个可序列化的列表,存储数据,在Inspector窗口上显示,或者通过Inspector窗口修改内容

接下来,我们只需要在实现自定义显示的类中根据这两个List​的序列化属性,自定义显示方式,使其看起来像是在编辑字典

利用两个List在Inspector窗口中自定义Dictionary显示

由于我们在Inspector窗口中显示的信息的数据来源是两个List
因此我们只需要利用List​在Inspector窗口中自定义显示的内容即可

与自定义List​在Inspector窗口上的显示相比,
与字典相关联的两个List​只需要一个int​变量表示长度即可,当int​变量变化时,需要同时修改两个List的元素
再根据两个List的元素,绘制显示键值对的控件

1
2
3
4
5
6
7
8
9
10
11
12
13
14
15
16
17
18
19
20
21
22
23
24
25
26
27
28
29
30
31
32
33
34
35
36
37
38
39
40
41
42
43
44
45
46
47
48
49
50
51
using PlasticPipe.Certificates;
using UnityEditor;
using UnityEngine;

[CustomEditor(typeof(Lesson22))]
public class Lesson22Editor : Editor
{
private SerializedProperty keys;
private SerializedProperty values;
private int dicCount;

private void OnEnable()
{
keys = serializedObject.FindProperty("keys");
values = serializedObject.FindProperty("values");
dicCount = keys.arraySize;
}

public override void OnInspectorGUI()
{
serializedObject.Update();
dicCount = EditorGUILayout.IntField("字典容量", dicCount);
//当设置的字典容量变少时,把两个列表内多出来的元素删除掉
for (int i = keys.arraySize - 1; i >= dicCount; i--)
{
keys.DeleteArrayElementAtIndex(i);
values.DeleteArrayElementAtIndex(i);
}
//自定义字典在Inspector上的显示
for (int i = 0; i < dicCount; i++)
{
//当两个列表的元素数量小于设置的字典容量时,就需要为列表扩容
if (keys.arraySize <= i)
{
keys.InsertArrayElementAtIndex(i);
values.InsertArrayElementAtIndex(i);
}
//自定义键值对的显示
SerializedProperty indexKey = keys.GetArrayElementAtIndex(i);
SerializedProperty indexValue = values.GetArrayElementAtIndex(i);
//让键与值的显示水平并排
EditorGUILayout.BeginHorizontal();
indexKey.intValue = EditorGUILayout.IntField($"键值对{i}", indexKey.intValue);
indexValue.stringValue = EditorGUILayout.TextField(indexValue.stringValue);
EditorGUILayout.EndHorizontal();
}

serializedObject.ApplyModifiedProperties();
}
}

显示效果如下:

image