US3S2L12——高光纹理综合实现
高光纹理综合实现
接下来将高光纹理的映射实现融合到之前实现的法线纹理 Shader 内,
这里复用之前实现的 切线空间下的法线纹理 Shader
1
2
3
4
5
6
7
8
9
10
11
12
13
14
15
16
17
18
19
20
21
22
23
24
25
26
27
28
29
30
31
32
33
34
35
36
37
38
39
40
41
42
43
44
45
46
47
48
49
50
51
52
53
54
55
56
57
58
59
60
61
62
63
64
65
66
67
68
69
70
71
72
73
74
75
76
77
78
79
80
81
82
83
84
85
86
87
88
89
90
91
92
| Shader "TeachShader/Lesson51"
{
Properties
{
_MainColor("MainColor", Color) = (1, 1, 1, 1)
_MainTex("MainTex", 2D) = ""{}
_BumpMap("BumpMap", 2D) = ""{}
_BumpScale("BumpScale", Range(0, 1)) = 1
_SpecularColor("SpecularColor", Color) = (1, 1, 1, 1)
_SpecularNum("SpecularNum", Range(0, 20)) = 18
}
SubShader
{
Pass
{
Tags { "LightMode" = "ForwardBase" }
CGPROGRAM
#pragma vertex vert
#pragma fragment frag
#include "UnityCG.cginc"
#include "Lighting.cginc"
struct v2f
{
float4 pos: SV_POSITION;
float4 uv: TEXCOORD0;
float3 lightDir: TEXCOORD1;
float3 viewDir: TEXCOORD2;
};
float4 _MainColor;
sampler2D _MainTex;
float4 _MainTex_ST;
sampler2D _BumpMap;
float4 _BumpMap_ST;
float _BumpScale;
float4 _SpecularColor;
fixed _SpecularNum;
v2f vert (appdata_full v)
{
v2f data;
data.pos = UnityObjectToClipPos(v.vertex);
data.uv.xy = v.texcoord.xy * _MainTex_ST.xy + _MainTex_ST.zw;
data.uv.zw = v.texcoord.xy * _BumpMap_ST.xy + _BumpMap_ST.zw;
float3 binormal = cross(normalize(v.tangent), normalize(v.normal)) * v.tangent.w;
float3x3 rotation = float3x3(
v.tangent.xyz,
binormal,
v.normal
);
data.lightDir = mul(rotation, ObjSpaceLightDir(v.vertex));
data.viewDir = mul(rotation, ObjSpaceViewDir(v.vertex));
return data;
}
fixed4 frag (v2f i) : SV_Target
{
float4 packedNormal = tex2D(_BumpMap, i.uv.zw);
float3 tangentNormal = UnpackNormal(packedNormal);
tangentNormal.xy *= _BumpScale;
tangentNormal.z = sqrt(1.0 - saturate(dot(tangentNormal.xy, tangentNormal.xy)));
fixed3 albedo = tex2D(_MainTex, i.uv.xy).rgb * _MainColor.rgb;
fixed3 lambertColor = _LightColor0.rgb * albedo.rgb * max(0, dot(tangentNormal, normalize(i.lightDir)));
float3 halfA = normalize(normalize(i.viewDir) + normalize(i.lightDir));
fixed3 specularColor = _LightColor0.rgb * _SpecularColor.rgb * pow(max(0, dot(tangentNormal, halfA)), _SpecularNum);
fixed3 color = UNITY_LIGHTMODEL_AMBIENT.rgb * albedo + lambertColor + specularColor;
return fixed4(color.rgb, 1);
}
ENDCG
}
}
}
|
将高光遮罩纹理实现融入其中
- 从纹理中取出对应的遮罩掩码值(颜色的RGB值都可以使用)
- 用该掩码值和遮罩系数(我们自己定义的)相乘得到遮罩值
- 用该遮罩值和高光反射计算出来的颜色相乘
属性需要添加高光遮罩纹理 _SpecularMask 和遮罩系数 _SpecularScale:
1
2
3
4
5
6
7
8
9
10
11
| Properties
{
_MainColor("MainColor", Color) = (1, 1, 1, 1)
_MainTex("MainTex", 2D) = ""{}
_BumpMap("BumpMap", 2D) = ""{}
_BumpScale("BumpScale", Range(0, 1)) = 1
_SpecularMask("SpecularMask", 2D) = ""{}
_SpecularScale("_SpecularScale", Float) = 1
_SpecularColor("SpecularColor", Color) = (1, 1, 1, 1)
_SpecularNum("SpecularNum", Range(0, 20)) = 18
}
|
同时,片元着色器的高光反射计算部分也要修改为:
1
2
3
4
5
6
7
8
9
10
11
12
13
14
15
16
17
18
19
20
21
22
23
24
25
26
27
28
29
30
31
32
33
34
35
36
37
38
39
40
41
42
43
44
45
46
| struct v2f
{
float4 pos: SV_POSITION;
float4 uv: TEXCOORD0;
float3 lightDir: TEXCOORD1;
float3 viewDir: TEXCOORD2;
};
float4 _MainColor;
sampler2D _MainTex;
float4 _MainTex_ST;
sampler2D _BumpMap;
float4 _BumpMap_ST;
sampler2D _SpecularMask;
float4 _SpecularMask_ST;
float _SpecularScale;
float _BumpScale;
float4 _SpecularColor;
fixed _SpecularNum;
fixed4 frag (v2f i) : SV_Target
{
float4 packedNormal = tex2D(_BumpMap, i.uv.zw);
float3 tangentNormal = UnpackNormal(packedNormal);
tangentNormal.xy *= _BumpScale;
tangentNormal.z = sqrt(1.0 - saturate(dot(tangentNormal.xy, tangentNormal.xy)));
fixed3 albedo = tex2D(_MainTex, i.uv.xy).rgb * _MainColor.rgb;
fixed3 lambertColor = _LightColor0.rgb * albedo.rgb * max(0, dot(tangentNormal, normalize(i.lightDir)));
fixed maskNum = tex2D(_SpecularMask, i.uv.xy).r;
fixed specularMaskNum = maskNum * _SpecularScale;
float3 halfA = normalize(normalize(i.viewDir) + normalize(i.lightDir));
fixed3 specularColor =
_LightColor0.rgb * _SpecularColor.rgb *
pow(max(0, dot(tangentNormal, halfA)), _SpecularNum) *
specularMaskNum;
fixed3 color = UNITY_LIGHTMODEL_AMBIENT.rgb * albedo + lambertColor + specularColor;
return fixed4(color.rgb, 1);
}
|
完整 Shader 代码如下:
1
2
3
4
5
6
7
8
9
10
11
12
13
14
15
16
17
18
19
20
21
22
23
24
25
26
27
28
29
30
31
32
33
34
35
36
37
38
39
40
41
42
43
44
45
46
47
48
49
50
51
52
53
54
55
56
57
58
59
60
61
62
63
64
65
66
67
68
69
70
71
72
73
74
75
76
77
78
79
80
81
82
83
84
85
86
87
88
89
90
91
92
93
94
95
96
97
98
99
100
| Shader "TeachShader/Lesson55"
{
Properties
{
    _MainColor("MainColor", Color) = (1, 1, 1, 1)
    _MainTex("MainTex", 2D) = ""{}
    _BumpMap("BumpMap", 2D) = ""{}
    _BumpScale("BumpScale", Range(0, 1)) = 1
    _SpecularMask("SpecularMask", 2D) = ""{}
    _SpecularScale("_SpecularScale", Float) = 1
    _SpecularColor("SpecularColor", Color) = (1, 1, 1, 1)
    _SpecularNum("SpecularNum", Range(0, 20)) = 18
}
SubShader
{
Pass
{
Tags { "LightMode" = "ForwardBase" }
CGPROGRAM
#pragma vertex vert
#pragma fragment frag
#include "UnityCG.cginc"
#include "Lighting.cginc"
struct v2f
{
float4 pos: SV_POSITION;
float4 uv: TEXCOORD0;
float3 lightDir: TEXCOORD1;
float3 viewDir: TEXCOORD2;
};
float4 _MainColor;
sampler2D _MainTex;
float4 _MainTex_ST;
sampler2D _BumpMap;
float4 _BumpMap_ST;
sampler2D _SpecularMask;
float4 _SpecularMask_ST;
float _SpecularScale;
float _BumpScale;
float4 _SpecularColor;
fixed _SpecularNum;
v2f vert (appdata_full v)
{
v2f data;
data.pos = UnityObjectToClipPos(v.vertex);
data.uv.xy = v.texcoord.xy * _MainTex_ST.xy + _MainTex_ST.zw;
data.uv.zw = v.texcoord.xy * _BumpMap_ST.xy + _BumpMap_ST.zw;
float3 binormal = cross(normalize(v.tangent), normalize(v.normal)) * v.tangent.w;
float3x3 rotation = float3x3(
v.tangent.xyz,
binormal,
v.normal
);
data.lightDir = mul(rotation, ObjSpaceLightDir(v.vertex));
data.viewDir = mul(rotation, ObjSpaceViewDir(v.vertex));
return data;
}
fixed4 frag (v2f i) : SV_Target
{
float4 packedNormal = tex2D(_BumpMap, i.uv.zw);
float3 tangentNormal = UnpackNormal(packedNormal);
tangentNormal.xy *= _BumpScale;
tangentNormal.z = sqrt(1.0 - saturate(dot(tangentNormal.xy, tangentNormal.xy)));
fixed3 albedo = tex2D(_MainTex, i.uv.xy).rgb * _MainColor.rgb;
fixed3 lambertColor = _LightColor0.rgb * albedo.rgb * max(0, dot(tangentNormal, normalize(i.lightDir)));
fixed maskNum = tex2D(_SpecularMask, i.uv.xy).r;
fixed specularMaskNum = maskNum * _SpecularScale;
float3 halfA = normalize(normalize(i.viewDir) + normalize(i.lightDir));
fixed3 specularColor =
_LightColor0.rgb * _SpecularColor.rgb *
pow(max(0, dot(tangentNormal, halfA)), _SpecularNum) *
specularMaskNum;
fixed3 color = UNITY_LIGHTMODEL_AMBIENT.rgb * albedo + lambertColor + specularColor;
return fixed4(color.rgb, 1);
}
ENDCG
}
}
}
|
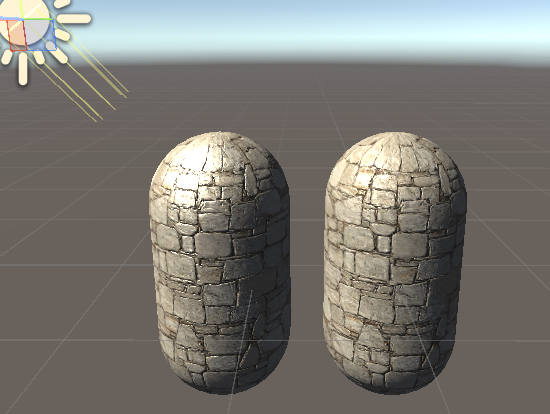
显示效果(左为不使用高光遮罩纹理,右为使用高光遮罩纹理):

可见,不使用高光遮罩纹理的模型出现了很亮的亮班,
而使用高光遮罩纹理的模型高光就没有那么明显,对于砖石材质来说更加自然了
遮罩纹理中的RGBA值
对于高光遮罩纹理中的RGBA值,从使用率上来讲是非常浪费的,因为我们只使用其中一个值就可以得到我们想要的数据
因此对于遮罩纹理来说,我们可以合理的利用其中的每一个值来存储我们想要的数据
随着以后的学习,我们可以在遮罩纹理当中存储更多信息,比如:
- R值代表高光遮罩数据
- G值代表透明遮罩数据
- B值代表特效遮罩数据
等等,甚至可以用 n 张遮挡纹理存储 4*n 个会参与 每个片元渲染计算的值

