US3S8L10——CSharp代码动态生成程序纹理
US3S8L10——CSharp代码动态生成程序纹理
C# 代码动态生成程序纹理
本章使用知识点包括:
- 利用 Unity 中
Texture2D类生成纹理对象- 利用
Renderer类设置材质球纹理- 利用 Unity 编辑器拓展知识自定义 Inspector 窗口,详见:UEDL7——Inspector窗口拓展
- 利用之前实现的单张纹理 Shader 用于测试,详见:US3S2L1——纹理颜色采样
C# 代码动态生成程序纹理相对较简单,我们只需要按需求用代码绘制纹理图片
在需要的时候更新程序纹理即可,更新纹理的时机可以根据需求来定,可以是在编辑模式下,可以是在运行时
修改贴图的某个像素的颜色并应用
设置像素的方法是 texture2D.SetPixel()
- 参数一:修改的像素所在的 x 轴值
- 参数二:修改的像素所在的 y 轴值
- 参数三:像素要修改成的颜色
1 | texture.SetPixel(x, y, color); |
像素颜色修改后还需要使用 texture2D.Apply() 应用修改才能生效
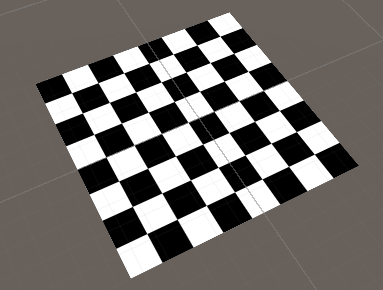
以动态生成国际象棋棋盘格为例:
-
设置程序纹理可编辑参数
纹理宽高、棋盘格行列数、棋盘格两种颜色
1
2
3
4
5
6
7
8
9
10
using UnityEngine;
public class Lesson88 : MonoBehaviour
{
public int textureWidth = 256; // 程序纹理的宽
public int textureHeight = 256; // 程序纹理的高
public int tileCount; // 国际象棋棋盘格的行列数
public Color color1 = Color.white; // 第一种棋盘格的颜色
public Color color2 = Color.black; // 第二种棋盘格的颜色
} -
实现更新纹理方法
-
创建
Texture2D对象,通过参数设置尺寸 -
设置纹理对象每个像素的颜色
国际象棋棋盘排布规则:国际象棋棋盘的 x 和 y 方向,按格子分,
格子的行列编号同奇同偶则为白色,不同则为黑色,我们只需要判断 (x, y) 像素所在格子和上面规则的关系即可 -
应用像素变化
使用
tex.Apply()就会应用像素的变化
1
2
3
4
5
6
7
8
9
10
11
12
13
14
15
16
17
18
19
20
21
22
23
24
25
26
27
28
29
30
31
32
33
/// <summary>
/// 更新纹理
/// </summary>
public void UpdateTexture()
{
Texture2D tex = new Texture2D(textureWidth, textureHeight);
int tileWidth = textureWidth / tileCount;
int tileHeight = textureHeight / tileCount;
int tileX = 0;
int tileY = 0;
// 遍历生成的纹理的每一个像素点
for (int y = 0; y < textureHeight; y++)
{
for (int x = 0; x < textureWidth; x++)
{
// 获取当前像素所在的格子编号,并判断其所属格子编号是否同为奇数或偶数
tileX = x / tileWidth;
tileY = y / tileHeight;
if ((tileX % 2) == (tileY % 2))
{
// 同为奇数或偶数,格子为白色
tex.SetPixel(x, y, color1);
}
else
{
// 同为奇数或偶数,格子为黑色
tex.SetPixel(x, y, color2);
}
}
}
// 应用像素变化
tex.Apply();
} -
设置材质球主纹理
-
获取脚本依附对象的
Renderer渲染器脚本
Renderer 是MeshRenderer 和LineRenderer的基类 -
通过渲染器脚本设置材质球主纹理
1
2
3
4
5
6
// 得到渲染器,在得到其使用的材质球,对材质球修改其主纹理
Renderer renderer = this.gameObject.GetComponent<Renderer>();
if (renderer != null)
{
renderer.sharedMaterial.mainTexture = tex;
}
1 | using System.Collections; |
让一个平面使用之前实现的单张纹理 Shader,并挂载上文实现的脚本,然后运行程序,显示效果如下:

在Inspector窗口添加更新纹理按钮
目前的程序纹理只能才程序运行时才能看到效果,而编辑器情况下看不到,因此我们可以:
- 为生成纹理脚本新建自定义 Inspector 窗口用脚本
- 添加自定义编辑器特性
- 重写
OnInspectorGUI() 方法,在其中使用DrawDefaultInspector()方法显示默认组件 - 新建按钮,用于调用材质更新方法
1 | using UnityEditor; |
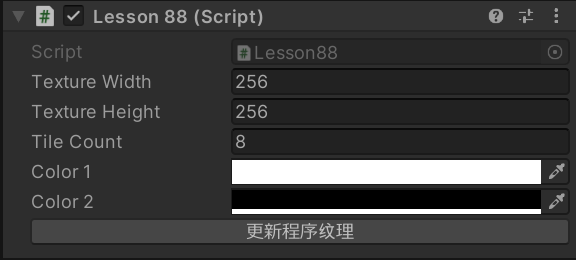
Inspector 显示内容:

点击 "更新程序纹理" 后显示内容:

本博客所有文章除特别声明外,均采用 CC BY-NC-SA 4.0 许可协议。转载请注明来源 文KRIFE齐的博客!
