UPL9-17-f——获取 GPU 数据
本章代码关键字
1
2
3
4
5
6
7
8
| computeBuffer.GetData()
AsyncGPUReadback.Request()
AsyncGPUReadbackRequest
asyncGPUReadbackRequest.GetData<>()
asyncGPUReadbackRequest.hasError
RenderTexture.active
texture.ReadPixels()
texture.SetPixelData()
|
哪些数据可以被获取
想要在 CPU 侧(C# 中)获取通过 Compute Shader 在 GPU 中计算完成的数据,必须要满足以下的条件:
-
数据在 GPU 中必须是 可读写 的资源
常见的可读写资源包括:
-
RWStructuredBuffer / RWByteAddressBuffer(对应 C# 的 ComputeBuffer)
-
RWTexture2D / RWTexture3D(对应 C# 的 RenderTexture)
只有 GPU 写入了这些资源,CPU 才有可获取的结果
-
数据在 CPU 和 GPU 之间必须通过 ComputeBuffer 或 Texture 形式传递
注意:
- 对于 标量类型、向量类型、矩阵类型 如果想要读取,需要使用可读写缓冲区进行包裹利用
ComputeBuffer 进行传递
-
cbuffer(常量缓冲区)是单向的,只能 CPU 到 GPU,不可反向读取
获取 GPU 侧计算好的数据 —— ComputeBuffer
假设我们通过 Compute Shader 计算一个 int 数组和 Test 结构体数组,通过 buffer 和 buffer2 接收计算结果
1
2
3
4
5
6
7
8
9
10
11
12
13
14
15
16
17
18
19
20
21
22
23
24
25
26
27
28
| #pragma kernel CSMain
#pragma kernel CSMain2
struct Test
{
float3 pos;
float3 v;
float lifeTime;
};
RWStructuredBuffer<int> buffer;
RWStructuredBuffer<Test> buffer2;
[numthreads(32,1,1)]
void CSMain (uint3 id : SV_DispatchThreadID)
{
buffer[id.x] = id.x;
}
[numthreads(32,1,1)]
void CSMain2 (uint3 id : SV_DispatchThreadID)
{
Test t = buffer2[id.x];
t.pos.x = id.x;
t.v.y = id.x * 10;
t.lifeTime = 999;
buffer2[id.x] = t; // 修改完结构体需要再存回去
}
|
同步获取 ComputeBuffer 数据
该获取方式主要是利用 ComputeBuffer 中的 GetData 方法
但是该方法会阻塞 CPU,会等待 GPU 计算完成后得到数据才会继续执行后面的逻辑
注意:GPU 一定是用来处理大量数据的,若数据量不大,则 CPU 和 GPU 的通信成本可能大于 GPU 的计算成本,反而不如直接使用 CPU 循环处理
1
2
3
4
5
6
7
8
9
10
11
12
13
14
15
16
17
18
19
20
21
22
23
24
25
26
27
28
29
30
31
32
33
34
35
36
37
38
39
40
41
42
43
44
| using UnityEngine;
public struct Test
{
public Vector3 pos;
public Vector3 v;
public float lifetime;
}
public class Lesson98 : MonoBehaviour
{
public ComputeShader computeShader;
void Start()
{
var computeBuffer = new ComputeBuffer(1000000, sizeof(int));
var array = new int[1000000];
computeBuffer.SetData(array);
var computeBuffer2 = new ComputeBuffer(2000000, 28);
var array2 = new Test[1000000];
computeBuffer2.SetData(array2);
var index = computeShader.FindKernel("CSMain");
var index2 = computeShader.FindKernel("CSMain2");
computeShader.SetBuffer(index, "buffer", computeBuffer);
computeShader.SetBuffer(index2, "buffer2", computeBuffer2);
int groupNums = Mathf.CeilToInt(1000000f / 32f);
computeShader.Dispatch(index, groupNums, 1, 1);
int groupNums2 = Mathf.CeilToInt(2000000f / 32f);
computeShader.Dispatch(index2, groupNums2, 1, 1);
computeBuffer.GetData(array);
print($"array: [0]: {array[0]}, [50]: {array[50]}, [500]: {array[500]}, [5000]: {array[5000]}, [50000]: {array[50000]}");
computeBuffer2.GetData(array2);
print($"array2[0]: pos: {array2[0].pos}, v: {array2[0].v}, lifeTime: {array2[0].lifetime}");
print($"array2[50]: pos: {array2[50].pos}, v: {array2[50].v}, lifeTime: {array2[50].lifetime}");
print($"array2[500]: pos: {array2[500].pos}, v: {array2[500].v}, lifeTime: {array2[500].lifetime}");
print($"array2[5000]: pos: {array2[5000].pos}, v: {array2[5000].v}, lifeTime: {array2[5000].lifetime}");
}
}
|
输出:
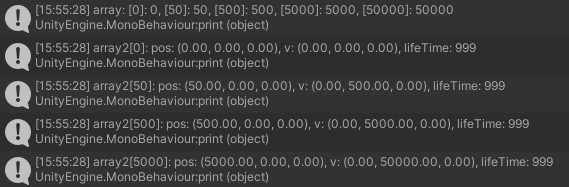
可以看到,两个数组在 GPU 中计算了数据
异步获取 ComputeBuffer 数据
若不想阻塞 CPU,待 GPU 计算完成后自动回调,则可以使用 AsyncGPUReadback.Request() 方法来异步读取数据,
需要传入要异步等待获取数据的 ComputeBuffer 对象,以及参数为 AsyncGPUReadbackRequest 回调函数,异步获取时最快也得下一帧返回信息
通过 asyncGPUReadbackRequest.hasError 可以判断计算过程中是否出错,若未出错再去通过 AsyncGPUReadbackRequest 获取数据
通过 asyncGPUReadbackRequest.GetData<>() 传入数据元素的类型,获取 NativeArray<> 数组,通过该数组即可读取计算结果
注意:回调函数中参数的 asyncGPUReadbackRequest.GetData<>() 方法,传入的泛型是结构体,代表单个元素的类型
asyncGPUReadbackRequest.GetData<>() 方法会返回一个 NativeArray<> 数组,建议直接使用,而不建议在此基础上再做任何强转,例如转换为 C# 数组等
1
2
3
4
5
6
7
8
9
10
11
12
13
14
15
16
17
18
19
20
21
22
23
24
25
26
27
28
29
30
31
32
33
34
35
36
37
38
39
40
41
42
43
44
45
46
47
48
49
50
51
52
53
54
55
56
57
58
| using UnityEngine;
using UnityEngine.Rendering;
public struct Test
{
public Vector3 pos;
public Vector3 v;
public float lifetime;
}
public class Lesson98 : MonoBehaviour
{
public ComputeShader computeShader;
void Start()
{
var computeBuffer = new ComputeBuffer(1000000, sizeof(int));
var array = new int[1000000];
computeBuffer.SetData(array);
var computeBuffer2 = new ComputeBuffer(2000000, 28);
var array2 = new Test[1000000];
computeBuffer2.SetData(array2);
var index = computeShader.FindKernel("CSMain");
var index2 = computeShader.FindKernel("CSMain2");
computeShader.SetBuffer(index, "buffer", computeBuffer);
computeShader.SetBuffer(index2, "buffer2", computeBuffer2);
int groupNums = Mathf.CeilToInt(1000000f / 32f);
computeShader.Dispatch(index, groupNums, 1, 1);
int groupNums2 = Mathf.CeilToInt(2000000f / 32f);
computeShader.Dispatch(index2, groupNums2, 1, 1);
AsyncGPUReadback.Request(computeBuffer, (request) =>
{
if (!request.hasError)
{
var array = request.GetData<int>();
print($"array: [0]: {array[0]}, [50]: {array[50]}, [500]: {array[500]}, [5000]: {array[5000]}, [50000]: {array[50000]}");
}
});
AsyncGPUReadback.Request(computeBuffer2, (request) =>
{
if (!request.hasError)
{
var array2 = request.GetData<Test>();
print($"array2[0]: pos: {array2[0].pos}, v: {array2[0].v}, lifeTime: {array2[0].lifetime}");
print($"array2[50]: pos: {array2[50].pos}, v: {array2[50].v}, lifeTime: {array2[50].lifetime}");
print($"array2[500]: pos: {array2[500].pos}, v: {array2[500].v}, lifeTime: {array2[500].lifetime}");
print($"array2[5000]: pos: {array2[5000].pos}, v: {array2[5000].v}, lifeTime: {array2[5000].lifetime}");
}
});
}
}
|
输出:
获取 GPU 侧计算好的数据 —— Texture
假设我们通过 Compute Shader 计算一个贴图的颜色,
让贴图的左下角为黑色 RGBA(0,0,0,1),右下角为红色 RGBA(1,0,0,1),左上角为绿色 RGBA(0,1,0,1),右上角为红色绿色混合 RGBA(1,1,0,1)
1
2
3
4
5
6
7
8
9
10
11
12
| #pragma kernel CSMain
float textureWidth; // 贴图的宽度
float textureHeight; // 贴图的高度
RWTexture2D<float4> Result;
[numthreads(8,8,1)]
void CSMain (uint3 id : SV_DispatchThreadID)
{
// 根据坐标计算像素颜色
Result[id.xy] = float4(id.x / textureWidth, id.y / textureHeight, 0, 1);
}
|
同步获取 Texture 数据
利用传入 RenderTexture 数据进行写入,写入完成后利用 Texture 装载结果数据
具体做法是,先将 RenderTexture.active (相当于当前 GPU 输出缓冲的指针)设置为传入到 Compute Shader 内的 RenderTexture
然后通过 texture.ReadPixels() 从 RenderTexture.active 读取像素,读取范围就是 RenderTexture 的尺寸
读取完毕后需要使用 texture.Apply() 应用读取结果
注意,使用完毕后需要将 RenderTexture.active 设置为 null,释放当前 GPU 输出缓冲的指针,防止影响后续渲染流程
然后,将计算完毕的 RenderTexture 释放(Release())掉,避免内存泄漏
1
2
3
4
5
6
7
8
9
10
11
12
13
14
15
16
17
18
19
20
21
22
23
24
25
26
27
28
29
30
31
32
33
34
35
| using UnityEngine;
using UnityEngine.Rendering;
using UnityEngine.UI;
public class Lesson98 : MonoBehaviour
{
public ComputeShader computeShader2;
public RawImage image;
void Start()
{
var renderTexture = new RenderTexture(512, 512, 0);
renderTexture.enableRandomWrite = true;
renderTexture.Create();
var index3 = computeShader2.FindKernel("CSMain");
computeShader2.SetFloat("textureWidth", renderTexture.width);
computeShader2.SetFloat("textureHeight", renderTexture.height);
computeShader2.SetTexture(index3, "Result", renderTexture);
var groupNumX = Mathf.CeilToInt(renderTexture.width / 8f);
var groupNumY = Mathf.CeilToInt(renderTexture.height / 8f);
computeShader2.Dispatch(index3, groupNumX, groupNumY, 1);
var texture = new Texture2D(renderTexture.width, renderTexture.height, TextureFormat.RGBA32, false);
RenderTexture.active = renderTexture;
texture.ReadPixels(new Rect(0, 0, renderTexture.width, renderTexture.height), 0, 0);
texture.Apply();
image.texture = texture;
RenderTexture.active = null;
renderTexture.Release();
}
}
|
渲染结果:

异步获取 Texture 数据
若不想阻塞 CPU,待 GPU 计算完成后自动回调,则可以使用 AsyncGPUReadback 来异步读取数据
需要传入要异步等待获取数据的 RenderTexture 对象,以及参数为 AsyncGPUReadbackRequest 回调函数,异步获取时最快也得下一帧返回信息
通过 asyncGPUReadbackRequest.hasError 可以判断计算过程中是否出错,若未出错再去通过 AsyncGPUReadbackRequest 获取数据
通过 asyncGPUReadbackRequest.GetData<>() 传入 Color 类型,获取 NativeArray<Color> 颜色数据信息,
通过 texture.SetPixelData() 即可从 NativeArray<Color> 读取计算结果
注意:在纹理回调中可以直接获取颜色数据 NativeArray<Color>,然后通过 texture.SetPixelData() 赋值给纹理
1
2
3
4
5
6
7
8
9
10
11
12
13
14
15
16
17
18
19
20
21
22
23
24
25
26
27
28
29
30
31
32
33
34
35
36
37
38
| using UnityEngine;
using UnityEngine.Rendering;
using UnityEngine.UI;
public class Lesson98 : MonoBehaviour
{
public ComputeShader computeShader2;
public RawImage image;
void Start()
{
var renderTexture = new RenderTexture(512, 512, 0);
renderTexture.enableRandomWrite = true;
renderTexture.Create();
var index3 = computeShader2.FindKernel("CSMain");
computeShader2.SetFloat("textureWidth", renderTexture.width);
computeShader2.SetFloat("textureHeight", renderTexture.height);
computeShader2.SetTexture(index3, "Result", renderTexture);
var groupNumX = Mathf.CeilToInt(renderTexture.width / 8f);
var groupNumY = Mathf.CeilToInt(renderTexture.height / 8f);
computeShader2.Dispatch(index3, groupNumX, groupNumY, 1);
AsyncGPUReadback.Request(renderTexture, 0, (request) =>
{
if (!request.hasError)
{
var texture = new Texture2D(renderTexture.width, renderTexture.height, TextureFormat.RGBA32, false);
var data = request.GetData<Color>();
texture.SetPixelData(data, 0);
texture.Apply();
image.texture = texture;
renderTexture.Release();
}
});
}
}
|
渲染结果: